

How To Repair Cord Cellular Shades
Homeowners Ask: "Cleaved Strings on Honeycomb Shades. What's Next for Me?"
We know that Broken strings on Honeycomb shades tin can be frustrating to most of Canadian homeowners. Don't worry, it is not the cease of the world. Yous can repair your shades by yourself or with the help of experts from Wholesale Bullheaded Factory.
What are Cellular Honeycomb shades?
Cellular Honeycomb Shades are a unique type of blinds that traps air and creates a layer of insulation betwixt your windows and your room.
These shades are known to be very efficient. Why? This honeycomb bullheaded blocks the rut from getting into your room on hot summer days keeping it cooler. During wintertime and cooler days, information technology keeps common cold air from getting into your room making it warmer.
Because of their unique cellular honeycomb design, these blinds assistance cake out some of the noise coming from outside. You can enjoy a peaceful conversation with your loved ones in your home.
The almost important function of this Cellular Honeycomb Shade is it provides improve privacy compared to your usual blinds. It blocks light better and more than effectively considering of its multiple layers. Besides, cellular honeycomb blinds look good!
Repairing Cleaved String On Honeycomb Shades
For honeycomb shades owners, it is necessary that you lot know how to repair and restring your shades. These steps volition save you a swell deal of coin and fourth dimension.
Remove cleaved strings
- Unscrew the tassel and ready it aside. With a flathead screwdriver, open the pull string stop, and remove the strings.
- Close the shades, push button it up, and slide it towards the middle of the room. On a flat surface, measure and cutting the new nylon strings. The length of your strings should be: Length = (window width) + 2*(window superlative)
- Don't worry near the backlog string, you volition cut it later on.
- With a flathead screwdriver, take the cease caps off the summit rail and remove the screw so slide the summit track off. Push the string lock clips in from the side with needle-nose pliers. Slide the cord lock clips then remove the strings.
- Plow the shade over and from the bottom rail, pull the end caps off. Slide the bottom runway off.
- Untie and remove the broken strings.
Thread new strings through the shade
- After removing the broken strings, become a restringing needle and thread the new string. Make certain to leave 3 inches of cord at the lesser side of the honeycomb shade. Repeat this process for all the broken strings.
- With the excess 3 inches of string, tie a knot and pull tight. Repeat for other strings.
- Slide the lesser rail back into the honeycomb shade. And push button the bottom finish caps back into the rail.
- Turn the top rails over, exposing a minor gap. Thread the strings through this gap where the cord lock was removed.
- Selection up all the strings coming out from the cord lock cap and restring the string lock. Allow the thread laissez passer through the back opening to the front end opening. The strings should laissez passer through the blackness rectangular slice, this is of import. Make sure to pull the strings tight and then that they are only in the front end and side openings.
- Insert the cord lock back into the petty gap in the top track. The opaque plastic side should be facing upwardly. Lay the strings downward the middle of the shade and slide the top rail into the shade. Pull the string tightly through the string lock.
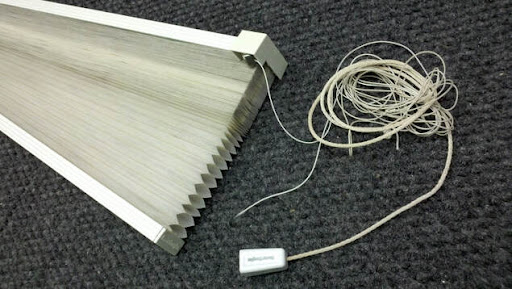
Broken strings on Honeycomb shades is one of common issues
Put the shades dorsum to the window
- Pull the strings tightly through the cord lock. Slide the top rail into the shade. Then, put the screws dorsum into the height rail. And put the cease caps dorsum into place.
- To hang your honeycomb shades back into place, in your window, push the shade upwards into the clips. Slide information technology towards the window.
- Open up the shades and cutting all the backlog strings and then the ends are halfway upward. Place the strings inside the string stop then close it. Feel costless to adjust your string stop to your liking.
- Slide open up the top half of the tassel and insert the tassel over the ends of the strings. So tie the ends together.
- Lastly, screw the lower half of the tassel onto the pinnacle half.
Other Common Cellular Shades Troubleshooting
Y'all might encounter a lot of issues when installing honeycomb shades. But some of these might be easy to gear up. Hither are the most common troubleshooting bug you might encounter:
- My honeycomb shade sags in the middle. You can add together additional brackets in the eye to stabilize your shades.
- The shade won't fit into their installation brackets. Check if your installation brackets are properly leveled and aligned. Brand sure the screws are flushed against the installation bracket.
- My shade is hitting my window handle. Y'all might demand to remount your shades farther away from the surface so they will not hit your window handle
Sometimes, however, the tasks are too hard for you lot to handle, do not hesitate to contact Wholesale Bullheaded Factory, we tin ready elementary problems very quickly or requite you replacement components if needed.

Source: https://www.wholesaleblindfactory.com/blog/repair-broken-string-on-honeycomb-shades/
Posted by: hermanhatintibleat.blogspot.com
0 Response to "How To Repair Cord Cellular Shades"
Post a Comment